Thursday, July 31, 2008

Eggs Jeanette


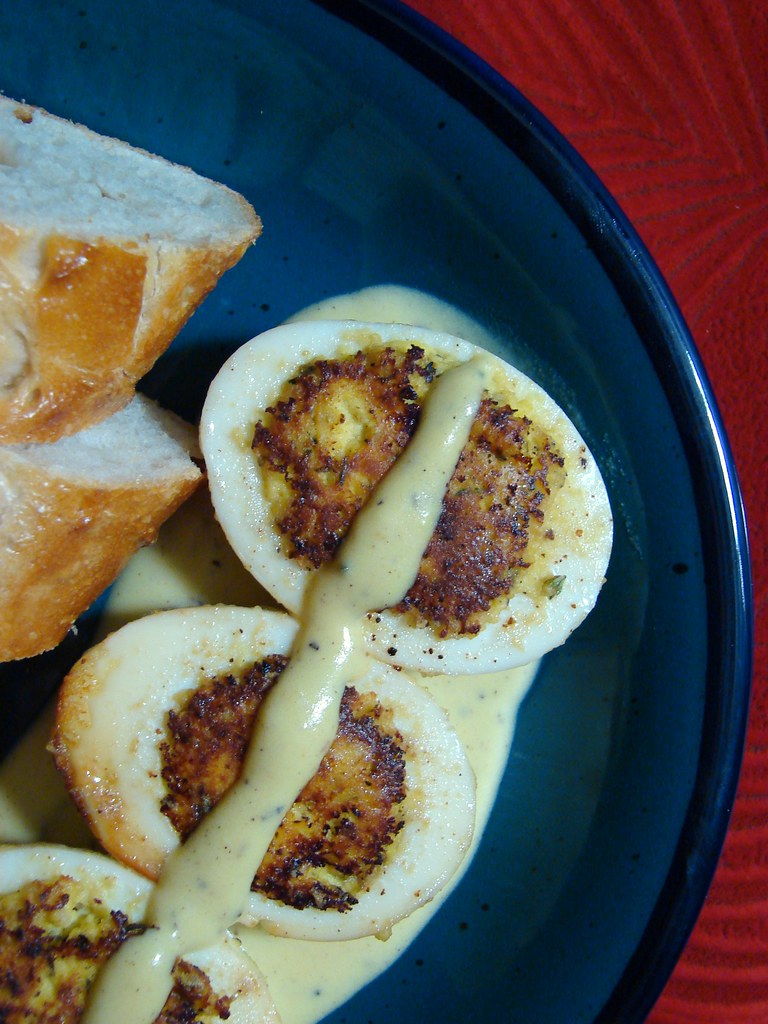
I just started reading Jacques Pepin's autobiography Apprentice; My Life in the Kitchen, and so far I'm loving it. Between that and reading Julia Child's My Life in France last winter (I don't know if I mentioned that I read it here....I didn't do a proper book report on it, but you should read it. It's awesome and inspiring. Do it.), I really want to go to France for an extended period of time. Anyway, I'm only a few chapters into Apprentice, but I've already had to cook something from it. Jacques Talks about his mother Jeanette's special egg dish. It's essentially deviled eggs that are pan fried and served with an egg dressing and some bread. I had everything I needed for it at home, and it sounded like a perfect simple comfort food for a rainy evening.


Jacques has the recipe on his website, but that version is different than the one in the book. Also, I used dried thyme instead of his parsley, so here is the recipe the way I prepared it:

Eggs Jeanette ala Iron Stef

3 hard-cooked eggs (see note below)
1+ tablespoons milk
1 clove garlic, chopped fine
1/2 Tablespoon dried thyme
salt and pepper
1 tablespoon oil
1 tablespoon butter

Cut the eggs in half crosswise at the widest point. Remove the yolks mash them, using a fork, with milk, garlic, thyme, salt, and pepper. The mixture should be moist and hold together. Restuff the whites with the yolk mixture, reserving approximately 1 1/2 tablespoons for the sauce.

Heat the oil and butter in a skillet, preferably the nonstick type. When the oil and butter are hot and foaming, place the egg halves, stuffed side down, in the skillet. Fry at medium heat for about 2 minutes. They will brown beautifully on the stuffed side. (Egg whites do not brown well and get tough if cooked in the hot fat.) Remove the eggs from the skillet, and arrange them over the sauce. Serve lukewarm or at room temperature with crusty French bread.

Egg Dressing

Approximately 1 1/2 tablespoons leftover egg-yolk mixture
1 Tablespoon Dijon-style mustard
1 tablespoon water
Dash of salt
Dash of white pepper
Approx. 1/4 cup olive oil

Combine everything but the olive oil in a bowl. Slowly pour in the olive oil while whisking until you have a nice sauce consistency.

Note: To boil the eggs, I used Martha's method of bringing the water and eggs to a boil, turning off the heat and letting them sit for 13 minutes. I then used a new technique that Jacques wrote about: after draining the water, shake the eggs around in the pan to crack the shells, cover with cold water and ice, let cool for 15 minutes then peel under running water. This worked pretty well...though I still had a couple of pockmarked ugly eggs. But I also had enough pretty eggs to make this recipe :)


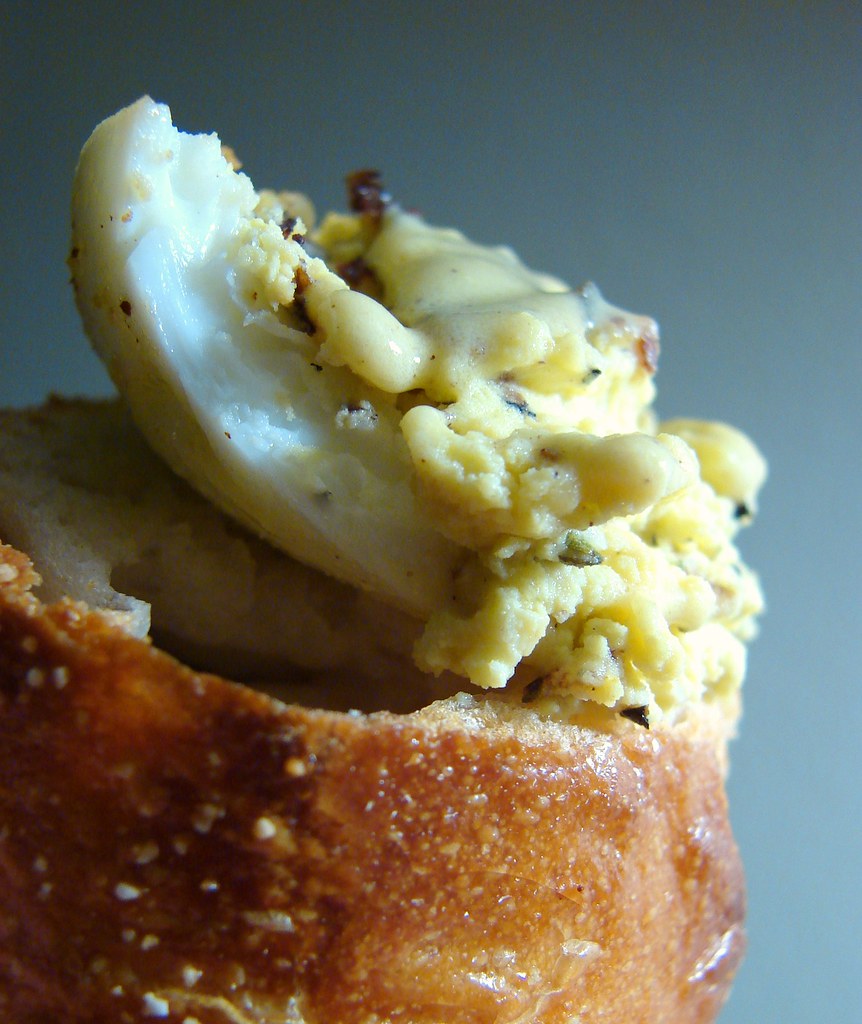
Yes. I say "yes" to this dish and to Jacques Pepin and to his mother. A lovely dinner...simple and flavorful with out being over-the-top rich. The mustard of the dressing really cuts through the rich yolks, and everything together smeared on warm crusty bread is quite beautiful. I'm excited to read the rest of the book and discover more rustic yet elegant dishes like this.

Tuesday, July 29, 2008

Taste & Create: Masala Egg Curry


I decided to participate in Taste & Create this month. Taste & Create is a blogging event/exchange/sharing/roundup thingy run by Nicole from For the Love of Food. Basically, she pairs food bloggers up, and we have to make a dish from each others' blogs. For July, I was paired up with Pavani of Cook's Hideout. Yay! Indian food! She opted to try out the Penne with roasted tomatoes I made back in March. She seemed to really like it! She used garbonzos instead of white beans, which is pretty darn brill...I'm gonna have to try that next time.

When it came to picking a recipe from Cook's Hideout, I had quite a selection. I had aspirations of making exotic Indian breads and chutneys and curries. I took too long deciding, in the end, and I am a few days late with this. Since I was such a slacker, I went with a dish that was simple and didn't require an extra trip to an Indian grocery store. Masala Egg Curry! Don't get me wrong, just because this was simple to make and shop for, doesn't mean it wasn't good. I really really liked this. The flavors were really green and fresh and spicy...great for this hot hot hot week in July.


I had to veer from Pavani's recipe a bit. For one, I used Jalepenos (no salmonella, phew!) instead of her green chiles. I'm not sure the difference, actually. I only used 5, as opposed to the 6-7 green chiles in the recipe. I was afraid my head would catch fire if I used 6 or 7 jalepenos. I also used ground cinnamon instead of a stick, and, since my dang store was out of fresh mint, I had to use a jarred mint chutney. Luckily, the ingredients in the chutney were similar to the flavors used in this dish, so it worked out for the best. Here is Pavani's recipe as altered by me:

Masala Egg Curry

Ingredients:
Mint chutney - about 2 Tablespoons
Eggs – 5, boiled
Red Chili powder – ½ tsp
Lemon - 1
salt

For the Masala:
Onion – 1 large, roughly chopped
Garlic – 6-7 cloves
Jalepenos – 5-6
Pepper - 1tsp
Cinnamon – 1/2 teaspoon
Almonds - 2 tbsp
Grated coconut – 2 tbsp
Coriander leaves – ½ cup


Method:
•Grind masala with little water to a smooth paste in food processor.

•Heat 2tbsp oil in a pan, add the masala and fry till it turns lightly brown and does not smell raw anymore, about 12-15 minutes. Add the mint chutney at some point during this process...I added it about 10 minutes into the frying.

•Add about 1cup water and salt to the gravy and let it come to a slow simmer (add more or less water depending on the consistency of the curry). Slide in the eggs along with salt and red chili powder. Simmer on low flame for another 7-8 minutes. Squeeze juice of 1 lemon and serve with rice and plain low-fat yogurt.


So, my first Taste & Create experience was a success! (If you don't count my tardiness...)

Thanks to Nicole for organizing such a fun event, and thanks to Pavani for having such wonderful taste!

Thursday, July 24, 2008

Barley Risotto with Chanterelles


Thanks to butterscott's shrooming skillz and generosity, Chanterelles made it into kitchen stadium for the second time ever! Last time I made this yummy and simple tart. This time I went with barley risotto. I've been wanting to make barley risotto for some time, and thought that these gorgeous, orange, earthy chanterelles would be a perfect addition to the nutty barley.

So I looked around the internets, and ended up on the legendary food blog, 101 cookbooks. Her recipe for Meyer Lemon Risotto sounded awesome, and I knew I could adapt it to fit in my pretty chanterelles. I stuck to the basic recipe for the most part, and changed it up when it came to the add-ins. Here is my altered version of Heidi's barley risotto:

Barley Risotto with Chanterelles

3 tablespoons extra-virgin olive oil
1 yellow onion, chopped
2 shallots, chopped
3 cloves garlic, chopped
1 teaspoon fine-grain sea salt
2 cups "medium" barley
1 cup good quality dry white wine
6 cups chicken stock
Grated zest of 1 lemon
2 handfuls chanterelle mushrooms, roughly chopped
1/2 cup Parmesan cheese
1/2 cup crème fraiche


Heat the olive oil in a large, heavy saucepan over medium heat, then add the onions, shallots, garlic, and salt and saute, stirring constantly, for about 4 minutes, or until the onion begins to soften.

Add the barley to the pot and stir until coated with a nice sheen, then add the white wine and simmer for 3 or 4 minutes, until the barley has absorbed the liquid a bit. Adjust the heat to maintain a gentle, active simmer.

In increments, add about 6 cups of stock, 1 cup at a time, letting the barley absorb most of the liquid between additions; this should take around 40 minutes altogether. Stir regularly so the grains on the bottom of the pan don't scorch. Add the mushrooms with the 4th or 5th cup of stock, so that they will get cooked, but not get mushy. You will know when the barley is cooked because it won't offer up much resistance when chewing (it will, however, be chewier than Arborio rice).

When the barley is tender remove the pot from heat. Stir in the lemon zest, Parmesan, and crème fraiche. Add salt to taste.


This turned out really good. Creamy and toothsome like a good risotto, but with the nutty flavor and chewiness of the barley. The rich forest flavor of the chanterelles shined with the summery fresh lemon and the creamy cheese and crème fraiche.

Oh, crème fraiche. This was my first time tasting it, even though I've heard it's praises sung on countless cooking shows and cookbook. Holy cow! Now I see why all the fuss. As someone who is not a huge fan of sour cream (although it totally has it's place in this world, no doubt), I am all about this rich, creamy, slightly tart substance of the gods. Like I needed a new vice.

Back to the risotto. I will be making this again. I felt good about the nutrition factor, but it also tasted kinda sinful! It's all about balance, people.


Now, this recipe makes A. LOT. of barley risotto. Like enough to give six grown-ass adults a full tummy. Just so you know. So there were leftovers, which I could not let go to waste. It was filled with treasure after all! Flecks of tasty fungus gold! To dress the leftover risotto up, I roasted some canned tomatoes, garlic and asparagus, with salt and olive oil, for about 30 minutes on 450. I put this mixture on top of the risotto and topped it all off with toasted pine nuts and more cheese. Yum!

Monday, July 21, 2008

3 easy peasy schmeasy spreads

Egged on by the success of my Pistachio Fig spread, I started thinking of other flavor combos I could add to spreadable cheese to make fun dips. For all of these, the base is simply cream cheese....1/3 less fat cream cheese, actually. Why not? Just stay away from the fat free cream cheese. Like waterlogged chalk, that stuff is. Blech! Basically, I wandered through the grocery store until inspiration struck. And you know one has bacon innit. Bacon...my muse.


Speaking of bacon...Here is the spread that bacon inspired. Chopped up bacon and pepperoncini mixed into cream cheese. Why pepperoncini? I thought the tartness of it would contrast nicely with the salty bacon (I was right, of course). Also, I had some in my fridge. And yes, that is a Real Ghostbusters cartoon sleeping bag we are using as a picnic blanket. Who you gonna call?


I wanted to use green olives in a spread. What could I add that was sweet, to compliment the salty briny olives? Hey look at that! Right underneath the olives in question at the store's olive bar...roasted red peppers! Winner! My punny cheese spreader says it all.


See what I found at the store? Pumpernickel Pretzel crackers fercryinoutloud! These were inspiring. These called for something special, yet classic. Smoke salmon and capers and red onions. A happy little family of perfect yumminess. Here's a cash-saving tip...check to see if your seafood department sells lox trimmings...basically the leftover shavings from when they cut smoke salmon into slices. They are the same delicious product, just not as pretty...perfect for chopping up to put into this spread!

Weee! This is fun! The possibilities are endless. What would chop up and add to cream cheese?!?!

Thursday, July 17, 2008

the best part of wakin' up...is breakfast burritos in your fridge!


Lately I've had a hankering for terrible breakfast foods such as breakfast burritos...bacon, egg, cheese, salsa. Yum! However, this is a very unhealthy way to start the day. I decided to try and make a more nutritious, less fat-laden version. And it turned out to be quite easy to do. For the "sausage"part, I cooked up some ground turkey with onions, garlic, green pepper, cumin, Mexican oregano and red chili powder. then cooked up some shredded potatoes in the same pan, with just some salt and pepper. To assemble the burrito, I laid out a whole wheat tortilla, put a little of potatoes, topped by the turkey, sprinkled a little bit of 2% milk shredded cheese, then topped it all with some scramble egg whites.

Add salsa, wrap it all up with the tortilla, and you have a satisfying and good-for-you hot breakfast. And best of all, unlike the greasy gooey fatty breakfast burritos available at your nearest gas station or fast food joint, these won't sit in your tummy like a brick, making you want to go right back to bed. These are actually like fuel to start your day. So, while I was at it, I went ahead and assembled a bunch more and wrapped each one up in foil. A whole stack of breakfasts ready to-go in my fridge! Yay!

Monday, July 14, 2008

not so awful for my first falafel

UPDATE! My Knight in Shining Oil was able to rescue my falafel! See below....


I love falafel. I usually get it from my favorite gyro place, Pita+ in Creve Couer, MO. This weekend, however, I decided to make it myself. Along with the pita bread! Yikes. I found a recipe online called "My favorite Falafel," and noticed in the search results, that it had my pal Nupur's seal of approval as well. Seemed like a winner to me! As for the pita bread, I chose this recipe, because it seemed easy (duh...it's called Carol's Easy Pita") and not very time consuming.

The falafel had good flavor, for sure. However, I got confused (happens easily) by some of the recipe instructions, specifically this part: "You want to add enough bulgur or flour so that the dough forms a small ball and no longer sticks to your hands." I had it in my mind that the "dough" would form a ball in the mixer, like a bread dough or something. O should have known better, as falafel is not at all bready, and should be indeed crumbly and moist. But "ball of dough" was in my doughy brain, and I kept adding flour to try to get this result. Of course, it never got that way even though I added probably double the amount of flour the recipe called for. I gave up and put the mixture into the fridge. After turning my thinking cap on and re-reading the recipe instructions, I see that I was supposed to form a small test ball in my hands. *Homer Simpson voice* Dough!


Anyway, I used an ice cream scoop as a measure, and deep fried the falafel. Like I said, the flavor of these was really good. The texture, due to my mistake, was dense and bready, though. I'll have to make these again, and next time I'll bring my common sense cap along.

The pita were too fluffy and flavorless. I don't think I did anything wrong on that recipe, but who knows...I was apparently in FAIL mode that day. It was an easy recipe, but I was not happy with the results, so I might look for different recipes for pita. Any suggestions?

Here are the recipes:

Carol's Easy Pita Bread
From here

2 cups flour
2 1/4 teaspoons quick-rising yeast
1/2 teaspoon salt
1 1/4 cups hot water (but not boiling)
1-1 1/2 cup flour

1. Combine first four ingredients in a large bowl.

2. Beat well about 1 minute.

3. Then mix in the remaining flour, using just enough to make a soft, sticky dough.

4. Turn out on floured board and continue to knead for 5 minutes.

5. Divide into 8 balls.

6. Roll out each one to about 1/4 inch thick and 6 inches in diameter.

7. Place on very lightly greased cookie sheet sprinkled with cornmeal (although cornmeal is really not necessary if you don't have it).

8. Let rise in warm place for 25-35 minutes .

9. Bake at 450 for 4 min, and then turn over for 4 more minutes or until lightly browned.

10. Wrap immediately in a dishtowel for 3 or 4 minutes.

My Favorite Falafel
From here

1 cup dried chickpeas
1/2 large onion, roughly chopped (about 1 cup)
2 tablespoons finely chopped fresh parsley
2 tablespoons finely chopped fresh cilantro
1 teaspoon salt
1/2-1 teaspoon dried hot red pepper
4 cloves of garlic
1 teaspoon cumin
1 teaspoon baking powder
4-6 tablespoons flour
Soybean or vegetable oil for frying
Chopped tomato for garnish
Diced onion for garnish
Diced green bell pepper for garnish
Tahina sauce
Pita bread

1. Put the chickpeas in a large bowl and add enough cold water to cover them by at least 2 inches. Let soak overnight, then drain. Or use canned chickpeas, drained.

2. Place the drained, uncooked chickpeas and the onions in the bowl of a food processor fitted with a steel blade. Add the parsley, cilantro, salt, hot pepper, garlic, and cumin. Process until blended but not pureed.

3. Sprinkle in the baking powder and 4 tablespoons of the flour, and pulse. You want to add enough bulgur or flour so that the dough forms a small ball and no longer sticks to your hands. Turn into a bowl and refrigerate, covered, for several hours.

4. Form the chickpea mixture into balls about the size of walnuts, or use a falafel scoop, available in Middle-Eastern markets.

5. Heat 3 inches of oil to 375 degrees in a deep pot or wok and fry 1 ball to test. If it falls apart, add a little flour. Then fry about 6 balls at once for a few minutes on each side, or until golden brown. Drain on paper towels. Stuff half a pita with falafel balls, chopped tomatoes, onion, green pepper, and pickled turnips. Drizzle with tahina thinned with water.


UPDATE!!
Jack came to my rescue (once again!) and found a solution to make the rest my overly-floured falafel mixture (I had made a double batch...)work. So, my falafel didn't work as balls. However, it happens to work brilliantly as flat discs!


Crispy and golden on the outside, airy on the inside. I was so thrilled, because like I said, these had good flavor all along, I was just disappointed by the texture. Making them a smaller, flatter shape let the deliciousness shine! These would make a good appetizer. Thanks, Sir Jack!

Wednesday, July 09, 2008

grilled shrimp & asparagus on polenta


Always trying to come up with simple summer dinners, Jack and I combined two of our favorite things to grill, shrimp and asparagus, and put them atop some creamy polenta.


That's about all there is to it, actually, but I'll give you a few more details. The shrimp and asparagus were tossed with olive oil, salt and pepper before being grilled. After being grilled, take the shrimp off the skewers, chop the asparagus into about 1 inch pieces, put them in a bowl with the shrimp and toss everything with fresh grated garlic, a touch more olive oil and fresh lemon juice. For the polenta, follow the package directions, adding Parmesan cheese at the end, and also adding some half and half to thin the mixture out a bit.

Eat this with some nice cold Sauvignon Blanc. Ahhhh...Summer!

Wednesday, July 02, 2008

soy sauce wings


On kind of a wing kick this weekend, Jack concocted these little guys. They were quite simple to make, and super-tasty! First, he marinated the wings in soy sauce, rice vinegar, sake (a 2-1-1 ratio on the liquid ingredients) grated fresh ginger and garlic.


Oh hey! Jack has just informed me that next time he'd leave out the sake, as he doesn't think it added anything. Okay, so soy sauce, rice vinegar, ginger garlic. Easy peasy.

The wings sat in the marinade for about 45 minutes, before getting patted dry, dredged lightly in flour and deep fried to a golden brown deliciousness.

I made an americanized-asian-style salad with stuff from the salad bar...red peppers, carrots, baby corn, water chestnuts, sunflower seeds and hard boiled eggs. I made a quick vinaigrette with soy sauce, vinegar, olive oil, fresh ginger and a dab of both sesame oil and honey. It was light and tart. Oh and I put chow mein noodles on top! Silly (but yummy)!