Sunday, August 24, 2008

Taste & Create: Siopao (Steamed Buns)


For this month's Taste & Create I was paired up with Jescel and Joseph's blog Spice Of Life. Whew! A lot of yummy looking things to try on that blog. I settled on one of my favorite foods that I rarely have: Steamed Buns! I love steamed buns, but have only had real fresh made ones once, at one of those giant oriental buffet places. I've also gotten them frozen, and while those are pretty good, they are nowhere near as fantastic as fresh ones, which are simultaneously fluffy and chewy, sweet and savory. So to be able to make my own steamed buns was on my to-do list.

This, of course, was a weekend project, as I had to make, what is essentially, real bread dough. With yeast and everything! I am so scared of bread-making, although I have had success before, making naan. There is so much that can go wrong. Will it rise? Will I over or under knead it? Luckily, Spice Of Life provided a very good recipe and instructions. My big white ball of dough rose as I wanted, and was easy to roll out and it sealed really well.


Since it was my first time making these, I chose to only do one of the fillings. And since we've had ground pork-filled baked goods already this week, I chose the chicken filling. Can I say that this was the first recipe I've ever used an entire bunch of green onions for? That impressed me for some reason. Usually you use one or two onions, and the rest are stuck back in the fridge to be forgotten. Anyway, the filling was quite sweet, but so good. The flavor is hard to describe...Jack said that it's very "Asiany." So there you go.


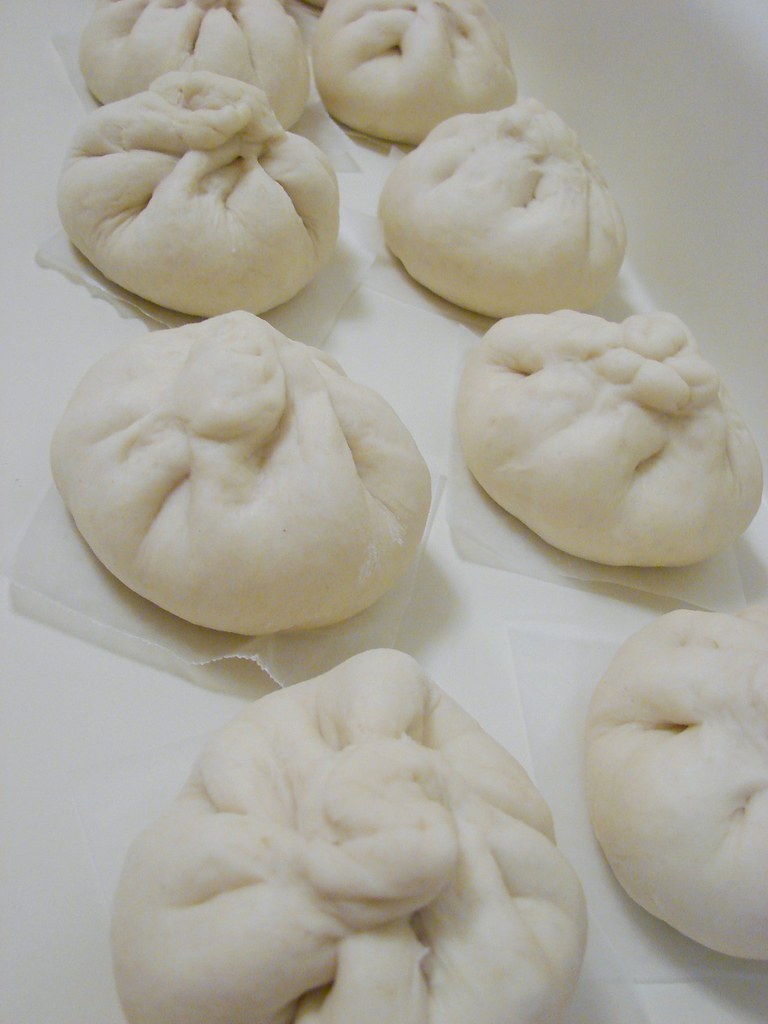
Like I said, the dough was easy to work with. It was elastic, yet rolled out into discs very well. Sealing the buns is easy. I simply pulled up two opposite sides and pinched them together, then the other 2 sides, then the 4 corners, so it was like a little sack that you have cinched with a rope or something. Then I gave the top a purple nurple. Voila! An adorable package of dough and meat, ready to be steamed.


I don't have a steamer, bamboo or otherwise, so I put the buns, 3 at a time, in a steamer basket set into a pot of simmering water with a bit of vinegar (The vinegar was a tip from Spice Of Life...it helps keep the buns snowy white). This baking by steam is what makes these buns so unique from any kind of baked goods I ever had growing up. The dough gets fluffy, like bread that we're used to, but it has a delicate chewiness and slight stickiness that is divine.


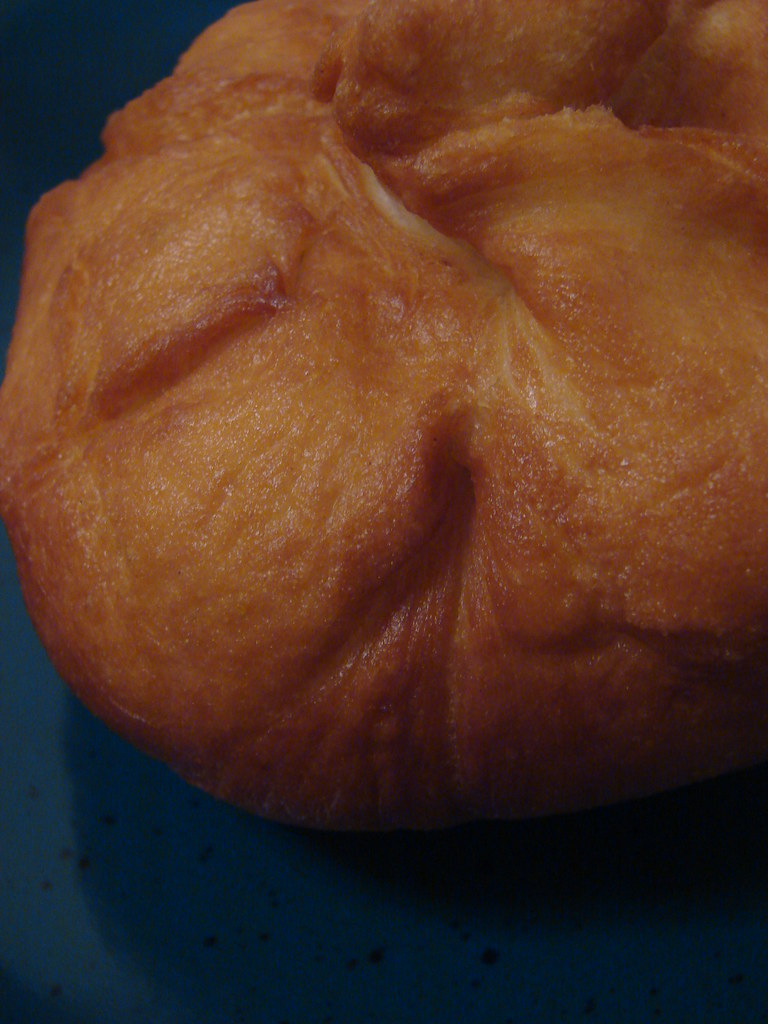
Of course, Jack, who I'm starting to think was a state-fair cook in a former life, decided he had to try and fry one of my buns. Well, he fried two, actually...one uncooked one and one that had already been steamed. The uncooked turned out chewy and slightly doughy, while the steamed one was fluffy yet greasy, and reminded me of a funnel cake. Both were good, of course (they were deep fried for gosh sakes! how bad could they be?), but we'll stick to just plain steamed.

All in all, I am most pleased with the results. The Siopao were some work, but nothing too hard, and they are so completely worth the effort. The recipe makes 10 buns, and they are about baseball sized, larger than I expected. I can't wait to do this again, and play around with different fillings. Thanks, Spice Of Life!!

Here are the recipes, copied directly from Spice Of Life because hey! They worked so well! Go to the entry for the pork filling recipe, which looks awesome, and the story of Siopao!

Dough:
1 cup warm water (about 100-110 degrees F)
3 tbsps sugar
1 package dry yeast (about 2-1/4 tsps)
3-1/4 cups all-purpose flour
3 tbsps canola oil
1/4 tsp salt
1-1/2 tsp baking powder
wax paper, cut into 2"x2" squares (about 12-20 pcs, depending on size of dough ball)

1. Combine warm water, sugar and yeast in a large bowl; let stand 5 minutes or until bubbly. DO NOT stir.

2. Spoon flour into the measuring cup and level with a knife. Add flour, oil and 1/4 tsp salt into yeast mixture. Mix well until soft dough forms.

3. Turn dough out into a floured surface. Knead until dough becomes smooth and elastic (about 10 minutes). Form into a ball.

4. Lightly oil/coat with cooking spray a large bowl. Place dough in the bowl, turning to coat top.

5. Cover with a clean, damp kitchen towel and let dough rise in a warm place (about 85 degrees F), for 2 hrs or until doubled in size. (Gently press two fingers into dough. If identation remains, dough has risen enough.)

6. Punch dough down; let rest 5 minutes. Turn dough out onto a clean surface; knead in baking powder. Let dough rest for 5 minutes.

7. Divide dough into two equal portions. Form one portion into a 10-inch log, and then cut into 5 equal pieces. Form each piece into a ball. Working with one dough ball at a time roll ball into a 4-5 inch circle. Make sure to cover remaining dough to keep them from drying.

8. Place about 1/4 cup of filling in the center of dough circle. Bring up sides to cover filling and meet on top.

9. Pinch and seal closed with a twist. Repeat procedure with rest of the dough.


Chicken Filling:
1 lb chicken breast, boneless & skinless (I added a thigh in there)
1/2 tsp five-spice powder
1 c green onions, thinly sliced
3 tbsps hoisin sauce
2 tbsps rice vinegar
1 tbsp soy sauce
1-1/2 tsp honey
1 tsp fresh ginger, minced
1 tsp garlic, minced
pinch of salt (be careful as soy sauce is already salty)
2 tbsps vegetable oil

1. Place chicken breasts in a pot. Add enough water to cover. Add dash of salt and pepper. Bring to boil. when boiling, reduce heat and allow to simmer until chicken is tender. Remove from water and let chicken cool.

2. When chicken is cool enough to handle, take two forks and shred the chicken into strips. Set aside.

3. Heat oil in a skillet. Saute onion till tender, then add garlic. Then add the cooked, shredded chicken and the rest of the ingredients.

4. Stir to mix and simmer for 2 minutes, or until bubbly.

5. Remove from heat to cool.

6. When cooled, add 1/4 of chicken to the dough circle. Do #8 and #9 procedures above under Dough.

Thursday, August 21, 2008

Petite Pork Pies!


A friend from work e-mailed me this recipe for cupcake tin pork pies, thinking it would be right up my ally. Boy oh boy was she correct in that assumption! I do have a love for meat products baked in muffin tins. They are cute, they are fun and they are MEAT! Yay! So I made these adorable little pork pies ASAP.


The only thing I changed on the recipe was adding some garlic (I always do that...geez!) and a bit more sage (just because I chopped too much and saw no reason to waste it). I also named them "Petite Pork Pies" because Alliteration is Awesome! Here's an adjusted version of the recipe:

Petite Pork Pies

3/4 pound ground pork
1 clove garlic, minced
1 medium onion, peeled and grated
1 teaspoon kosher salt
1/2 teaspoon freshly ground black pepper
1 1/2 tablespoons chopped fresh sage
1/2 cup panko bread crumbs
2 (9-inch) discs prerolled, refrigerated pie dough
2 eggs, beaten

1. Preheat oven to 375°F.

2. Grease 12-cup muffin tin with butter.

3. In a large bowl, combine all the ingredients but the dough and 1 tablespoon of the eggs; refrigerate.

4. Unroll the dough and cut out twelve 4-inch circles with a biscuit cutter or the rim of a drinking glass.

5. Reroll the scraps, then cut out 12 more 2-inch circles.

6. Line the bottoms and sides of the tins with the 4-inch rounds.

7. Divide the filling evenly among the cups. Press the 2-inch rounds on top, pinching the edges together to seal.

8. Poke a hole in the center of each pie.

9. Brush with the reserved egg and bake until the tops are browned and puffed slightly, 30 to 35 minutes.

10. Let cool for 15 minutes before removing the pies. Serve warm.


These were really good! The filling was moist and flavorful, and the crust was buttery and golden. A fun pre-portioned dinner (although it is really hard to just eat one...or two...), this would also work as a breakfast dish. Perhaps with a ooey gooey fried egg on top? *wipes drool off chin*

Tuesday, August 19, 2008

Hot Magenta! Bless my Soul!


I get cookbooks from the library all the time. If I didn't, that would mean I would have to buy them, and then I'd be homeless, rendering the cookbooks useless. So library it is! One I have checked out right now is called Just One Pot, by Lindsey Bareham. Looking through this one I had a hunch that this would be one of those rare cookbooks that I would have to buy. There are lots of recipes in there that I want to try. But first! A test recipe. Like I said, there were many options I wanted to try, but I went for the bright pink recipe. How could I resist? We all know I get a kick out of bright pink food. So I chose a recipe called Magenta Chicken Curry. The magenta, of course, is from beets. I am still amazed at the gorgeous color of beets. So vibrant! This dish was certainly a looker! Oh, and it taste super-good, too.


Here is the recipe (from my memory...I encourage you to check out the book...):

Magenta Chicken Curry

1 dried red chile pepper
3 Tbsp. vegetable oil
1 onion
3 cloves garlic, finely chopped
2 oz. knob of ginger, peeled and cut into tiny sticks
1 tsp. ground coriander
1 lb. boneless chicken, cut into bite size pieces
7 oz. plain yogurt, drained
2 raw beets
1 lemon
salt to taste

Just cover dried pepper with boiling water and let soak while onions cook. Slice onion thinly. In a large skillet, heat oil over medium heat. Add onion and cook until soft and golden. Remove pepper from water, cut off stem, slice open and remove seeds. Chop pepper finely, and add it, along with the ginger and garlic, to the onions. Cook 2 or 3 minutes, then add coriander. Cook another 30 seconds, then add the chicken. Cook until the chicken is no longer pink, then add the yogurt, cover and let simmer for about 15 minutes.

Meanwhile, peel and shred the beets directly into a small sauce pan using the large holes of a cheese grater or the large shredding blade on a mandolin. Add 1 1/4 cups of water and the juice of half a lemon to the beets, and cook 10-15 minutes until beets are tender.

Tip the beets and liquid into the pan with the chicken, stir and cook uncovered for about 10 more minutes, until curry thickens and all the flavors come together. Season with salt and lemon juice. Serve over jasmine rice and top with plain yogurt.

Friday, August 15, 2008

mustard and pretzel crusted chicken


Serious Eats! You never fail me! They posted this recipe for Mustard and Pretzel crusted chicken, and I had to try it right away. Whenever i get a soft pretzel somewhere, I dip it in mustard, so I was all over that flavor combo. Also, it seemed like an easy and fun weeknight meal. It doesn't hurt that this recipe was pretty much made to go with beer.

I followed the recipe pretty closely, the only change I made was using chicken thighs instead of breasts. So I won't bother re-posting the recipe here. Just check out the link above.


Other than the slightly weird taste of the butter snap pretzels I used (I'll be sticking to plain old regular pretzels next time...), this was a really good chicken dish. Easy to make, pretty healthy, fairly quick, cheap. I'll be making this again. And yes, it went really well with a cold beer...specifically Schlafly Dry-Hopped APA, a bracingly bitter and tart brew. Ahhh.

On the side, I roasted some cauliflower. I simply tossed some fresh cauliflower with olive oil, minced garlic, salt and pepper, and roasted it in oven along with the chicken (different pan!). When I took it out, I immediately tossed it with some butter and fresh lemon juice. Yay! i have another side dish in my arsenal! Very good.

Wednesday, August 13, 2008

bacon wrapped shrimp


Well, this is a dish that I still need to tweak, but I will be making it again. You see, it is simple, has few ingredients, and those ingredients go really well together. So what went wrong? Well first off, I had in my head "bacon wrapped shrimp," even though the idea came from the video blog food wishes, on which it was Serrano ham wrapped shrimp. But I must have forgotten that. So at the store, I got bacon, not Serrano ham. And the bacon I got, from the grocery store's meat counter, because I love buying bacon that way, was thick cut. Really, that was the main problem with my execution with these lovely little tapas.


Thick cut bacon is just too much for the poor little shrimp. It overpowered everything. However, when the shrimp was unwrapped? Yum. Smokiness and saltiness from the bacon, sweetness and tang from the orange, a bit of spice from the red pepper. Like I said, I will be doing this again...next time with a thinner cured meat...perhaps a thin sliced pancetta, or some prosciutto, or, if I come across it, some Serrano ham. Everything else will remain the same...

Bacon wrapped shrimp

-6 slices bacon, cut in half
-12 medium raw shrimp, peeled and deveined
-enough fresh squeezed orange juice to cover and marinate shrimp in a small bowl.
-good pinch of hot red chile powder

In a smallish bowl, marinate shrimp in orange juice and chile powder for about 15 minutes. Wrap shrimps in half slices of bacon. Place in hot non stick skillet with the part where the bacon ends on the bottom, so it stays put. Cook on one side for about 3 minutes until bacon is crispy, then flip over using tongs and cook another 2 or so minutes. Remove to paper towel lined plate. Drain most of the bacon fat and add marinade to the pan. Simmer until reduced a little into a slightly thick sauce. Drizzle sauce onto plate, and put shrimp on top. Serve with some crusty bread.

Thursday, August 07, 2008

Bake & Shark - hold the shark


In honor of Shark Week...well actually it just sort of happened that way...Jack made Bake & Shark sandwiches. You may recognize the Bake & Shark from the Trinidad and Tobago episode of Bizarre Foods with Andrew Zimmern:


Here's how our Bake & Shark adventure started...Jack decided a couple weekends ago to try his hand at making doughnuts from scratch. I know, he's a crazy person. He used Alton Brown's yeast doughnut recipe, and filled most of his creations with jam. A few, however he left unfilled, and they were good like that...not very sweet at all. I suggested he try some left over Mexican pulled pork I love my crock pot!!) on it, like it was a sandwich bun. And that totally worked. Yum! That's when Jack remembered the Bizarre Foods episode. I think it stuck in his mind because Zimmern was so taken with the Bake & Shark...he said it was one of his favorite sandwiches ever.


Jack did his research, and found a couple recipes to make authentic Bake & Shark, and the Shadow Bennie sauce that is often put on these sandwiches. We invited my brother and sis-in-law over and went shark shopping...well, we settled on Tilapia instead. And yes we have seen the episode of Dirty Jobs about Tilapia eating other Fishes Poo. It still makes a darn good sandwich.

On Bake & Shark night, Jack made the "Bake" using Alton's doughnut recipe again, minus the eggs and subbing oil for Crisco. Once the dough rose once, He shaped them into oblong rounds that would perfectly accommodate the tilapia fillets. Those rose some more, and then they were deep-fried. They were not quite as flavorful as the first doughnuts he made, but for a sandwich vessel, they were fab.


Here is how we made the rest of the Sandwiches:

Tilapia for Bake & Sharks

Juice from 1 lime
1 1/2 lbs. tilapia fillets
1 teaspoon minced garlic
2 Tbsp. minced fresh thyme
Flour for dredging
Vegetable oil for frying

Coat the tilapia with lime juice, garlic and thyme. Let sit for about 5-10 minutes. Dredge lightly in flour, then deep fry immediately until golden brown and delicious. Season with salt and pepper. Put it onto a Bake that's been sliced horizontally, top with a simple coleslaw (shredded cabbage, white wine vinegar, salt, pepper) and some Shadow Bennie Sauce (recipe below) and/or any other toppings of your choice (some things were used that night...mayo, pepperoncini rings, pickles). Make like a shark and tear that bad boy up!

Shadow Bennie Sauce

1/4 cup finely chopped cilantro
3/4 cup white wine vinegar
1 clove minced garlic
1 tsp. vegetable oil
1 serrano chile, minced

Mix it all up, let sit for at least 2 hours. Slap it on that Bake & Tilapia!


These were a hit. I love the idea of a fried bread as a bun. It's kinda decadent, and totally fun. The fish was flavorful, the sauce was tangy and spicy and the coleslaw gave it a fresh crunch.

Monday, August 04, 2008

chanterelle princess!


My shroom supplier made another drop last week! Chanterelles again? We're so spoiled! Not only that, but some home grown tomatoes, too! Woo!

This time Jack took over dinner. Always fine by me. I like being a princess...getting gifts and having someone cook them up for me? All on the same day? And it is not anywhere near my birthday or anything!

For the chanterelles, he added them to some pasta, pine nuts and a sage butter sauce. The tomatoes, naturally, became a Caprese salad...summer on a plate!

For the pasta dish, the mushrooms were sauteed briefly in olive oil with garlic, then set aside. Butter was added to the pan, and a small handful of whole fresh sage leaves. everything was cooked until the butter got slightly brown (this smelled soooo good), then pine nuts were added and the shrooms went back in. Cooked whole wheat cavatappi pasta was added to the pan with everything else, tossed to coat, and seasoned with salt and pepper. Parmesan cheese on top, of course. Oh sage and butter! How I love thee together! This sauce really complimented the chanterelles.


The Caprese was simply alternating slices of tomato and fresh mozzarella cheese, topped with a chiffonade of fresh basil, salt, pepper and drizzles of olive oil and balsamic vinegar. Perfection!!