Tuesday, December 30, 2008

Taste & Create: Wonton Soup


Wow this month has been busy. I hope everyone had a great Holiday!! I sure did, and lookie here, I managed to just barely get in my submission for this month's Taste & Create event. This time I was paired up with Happy Cook of My Kitchen Treasures. I had one more vacation day yesterday, so I was able to choose a recipe that is more of a weekend day project, Wonton Soup! It's not a hard recipe, really, but making all the little wontons and making stock is not a weekday night kind of deal. However, the freezer is now stocked up with lots of delicious little chicken wontons and several tubs of chicken stock, a staple.

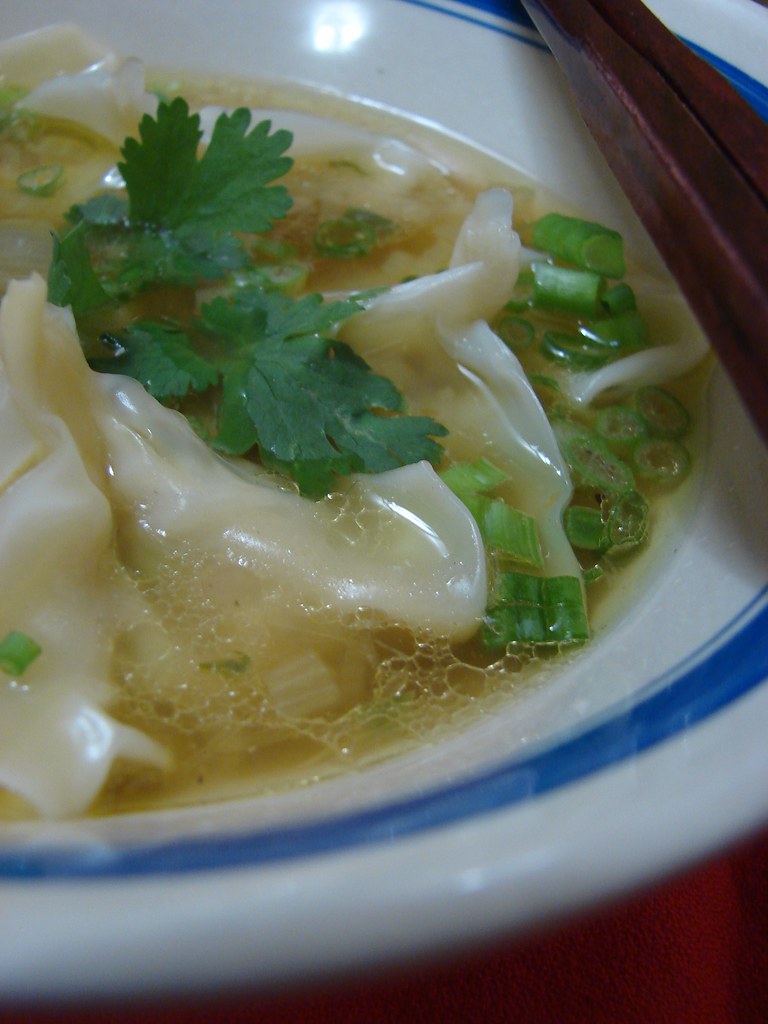
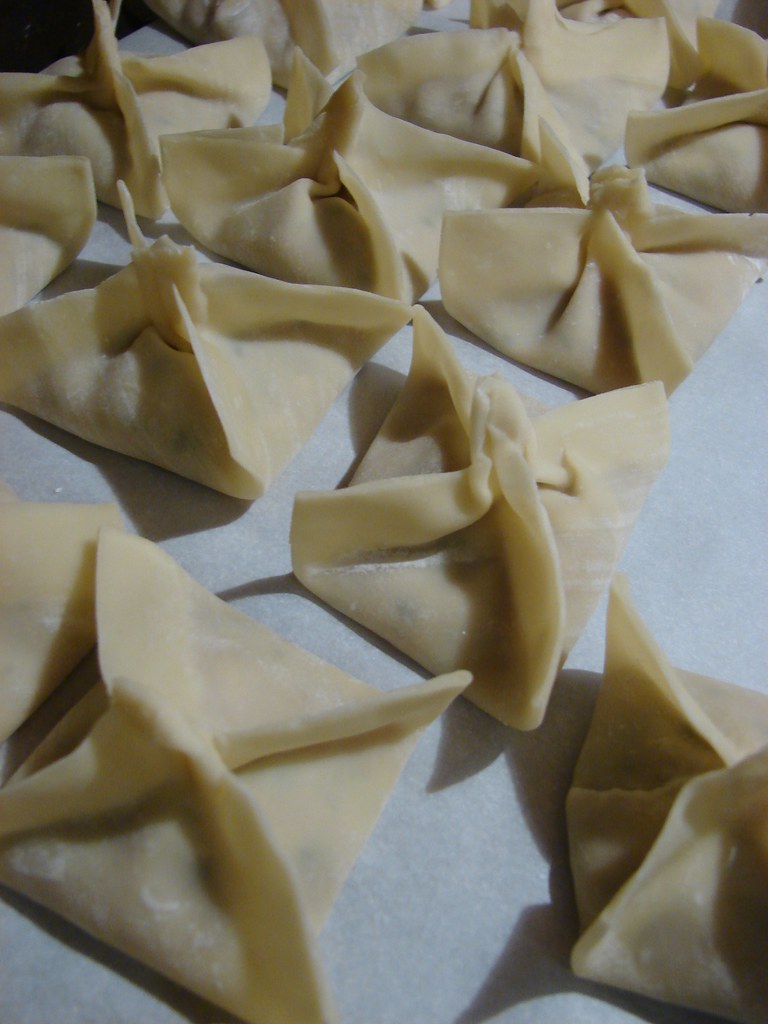
These wontons were sooo good. I followed Happy Cook's recipe pretty much word for word, except instead of bundle shapes, I made little hats, because when I tried the bundles, they seemed like they were going to tear. They have a nice healthy dose of ginger in them, so if you are a ginger fan like me, you will love these.


For the soup I used homemade stock, made from the bones of the chicken leg quarters I used for the stuffing of the wontons, and some backs and necks. I added garlic and salt and pepper and more soy sauce to my soup, but other than that it was Happy Cook's recipe. It's a lighter flavored soup that lets the wontons shine. Mine seemed a little oily...I think it's because I put too much skin in when I made the stock? Anyway...on to the recipes!!

Soup
1 to 2 Tbsp oil
1 onion chopped fine
1 small piece of ginger grated
3 garlic cloves, grated
2 to 3 chiles
about 6 cups chicken stock
2 tbsp soy sauce
salt and pepper

Heat the oil in a pan and fry the onions for a few minutes. Add the chiles, ginger, garlic and soy sauce and cook anther minute or so. Add the stock and Cook for 10 minutes. Taste and adjust seasonings. Ladle into bowls over cooked wontons. Serve hot. Garnish with green onions and cilantro.

Wontons
1 packet of store bought wonton wrappers
Meat from 4 chicken leg quarters (I bought the skin on, bone-in ones, and used the bones for my stock)
1 big piece of ginger, peeled and roughly chopped
2 cloves garlic
3 to 4 chiles or according to your taste
2 Tbsp of soy sauce or to your taste
4 Tbsp finley chopped spring onions
2 Tbsp cilantro leaves
1 Tbsp corn flour

Grind all ingredients together into a fine paste in a food processor.

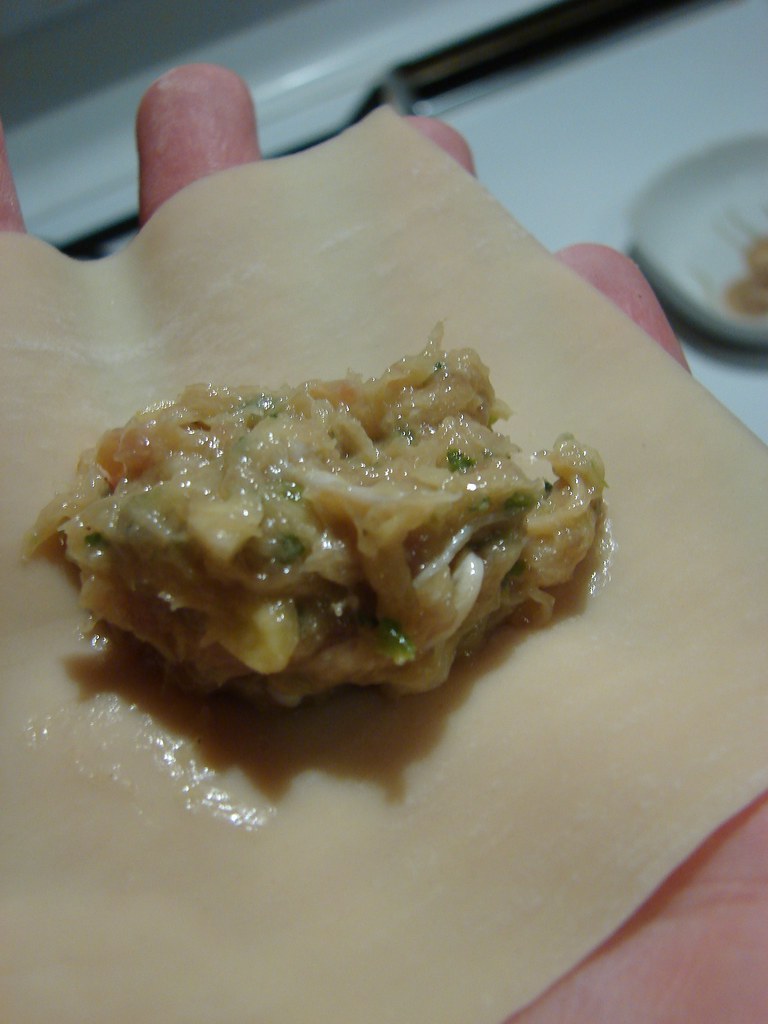
Place a Tbsp of filling in the middle of each wrapper, brush the sides of the wrapper with water and press the corners together, then press the 4 seams together to form little hat-like shapes. Set aside however many wontons you want for your soup (I used 4 per bowl), then freeze the rest on cookie sheets for about an hour before transferring them to a large freezer bag. Heat water in a big pot with salt and a bit of oil and when the water is boiling add the prepared wontons and cook for few minutes, drain them and put them in bowls for soup.


Friday, December 19, 2008

blue cheese pecan bread and a salad with beets!


Last night was one of those perfect winter weeknights. It was freezing rain outside, and I was INSIDE baking, watching 30 Rock, sitting by the fire and sipping wine. What was I baking? Blue Cheese Pecan Bread! I saw this recipe on Leite's Culinaria (an exerpt from this book), and it was like fate since I had blue cheese and pecans already...on the same shelf in the fridge, no less! Plus, it's not a yeast bread, but it's not quite a quick bread. Yeast breads scare me a little, but I want to graduate from quick breads. This required some kneading and shaping, but no rising. rising is the scary part.


Blue Cheese Pecan Bread

4 cups unbleached all-purpose flour
1/2 cup sugar
1 1/2 teaspoons baking soda
1 1/2 teaspoons baking powder
1 teaspoon salt
4 tablespoons unsalted butter, cut in 1/2-inch pieces, chilled
2 ounces blue cheese, crumbled (1/2 cup)
1/4 cup chopped pecans
1 1/2 cups plus 1 tablespoon buttermilk
1 large egg, beaten
Freshly ground black pepper

1. Preheat the oven to 400°F (200°C).
2. In a large bowl, sift together the flour, sugar, baking soda, baking powder, and salt. Cut in the butter until the mixture looks like oatmeal. Add the cheese and nuts, and toss to distribute in the flour.
3. Make a well in the center and add 1 1/2 cups of the buttermilk and the egg. Stir with a sturdy spoon until you have a shaggy dough.
4. Tip the dough out onto a lightly floured work surface and knead gently to bring together. Form into a slightly flattened 6-inch round. Place on a parchment-lined baking sheet. Brush with the remaining 1 tablespoon buttermilk and sprinkle with pepper. With a serrated knife, cut a shallow X in the top of the loaf.
5. Bake for 10 minutes. Reduce the oven temperature to 375°F (190°C) and bake for 35 minutes, or until the loaf is deep golden brown and sounds hollow when thumped on the bottom. Cool on a wire rack


It took almost 15 minutes longer to bake than the recipe said...maybe I didn't flatten it enough or something. Anyway, It turned out good! The crust is very nice...I guess because of all the sugar in it...it was crumbly and sweet. The bread itself is a nice combo of tangy, sweet, salty and nutty. I spread some spun honey on it and had it with a colorful salad.

The salad? Well I was inspired by a salad I had at Pi, a pizza place here in the Lou. The salad had little matchsticks of raw beets on it. I had never had beets raw, and they are great this way...crunchy, sweet, earthy, RED. I used my mandoline to make the little matchsticks, and mixed them with balsamic vinegar, olive oil, some juice from a clementine, salt and pepper. I put this dressing/beet mixture on top of some greens along with radishes and clementine segments. A very nice winter salad, indeed. The wine I had with it was Columbia Crest Two Vines 10 White Wine- a blend which went really nicely with the bread. I am normally a red wine gal, but the recipe suggested having the bread with a white. This one is quite fruity and flavorful for a white. I am adding it to my list of "crowd-pleaser" wines.

Thursday, December 11, 2008

Cauliflower soup with bacon and blue cheese


For some reason I've had a hankering to make cauliflower soup lately. So the other night I did just that! It was easy, and very nice for a cold night. The soup itself is pretty simple flavor wise, but I pumped it up by topping it with some of cauliflowers' BFFs-bacon and blue cheese. If it was all for me, I would've put the blue cheese directly into the soup...it gave it a much needed tanginess. However, my mom was having some too, and she doesn't like blue cheese, so I had to settle with it as a topping. It looked pretty, anyway.


Cauliflower Soup with Bacon and Blue Cheese

3 strips of bacon
4 cloves garlic, minced
1 large shallot, sliced thin
1 large russet potato, peeled and cut into large chunks
1 head cauliflower, cut into florets/chunks
1 Tablespoon butter
4 cups chicken stock
about 1 teaspoon smoked paprika
about 1/4 teaspoon fresh grated nutmeg
salt and pepper
Blue cheese,crumbled

Cook bacon in a large pot or dutch oven until crispy. Remove bacon, crumble and set aside. Cook garlic and shallot in bacon grease until softened and slightly brown. Add in potato and cauliflower and season with paprika, nutmeg, salt and pepper. Suate all of this for a few minutes, adding the butter. Add in stock and cook at a low simmer for about 40 minutes until sauliflower and poatato are nice and soft. Taste and add more seasoning if needed. Use an immersion blender or a food processor (in batches!) to puree everything together. Serve topped with crumbled bacon, blue cheese and a sprinkle of smoked paprika.

Wednesday, December 03, 2008

what I made for thanksgiving


I spent this thanksgiving with a dozen or so family members at my grandma's house this year. I was to bring a side dish and a dessert. For a side dish, I decided to spring something new on the fam...Parsnips. I know parsnips are not new, but I never had them growing up and most of the people I know have never had them.

I only first had parsnips a couple of months ago at a vegetable cooking class I took through work. This recipe is from that class, taught by Schnucks Food Expert Kathy, with a couple modifications...for one, when I did a trial for my immediate family, my smart, handsome little brother suggested that I add some garlic. Also, the original used fresh sage sprinkled on at the end...I used dried sage which I added before cooking. I used my thumb eater mandoline to slice the pasrnips into thin ribbons.

So how did my family react to this unfamiliar vegetable being thrust upon them? They loved it! Yay! I mean, there was bacon in it...and heavy cream...but wooo! I introduced people to a vegetable!

Parsnip Gratin with Sage

6 ounces bacon slices, chopped
2 cloves garlic, minced
2 pounds parsnips (about 11 medium), peeled, trimmed and thinly sliced lengthwise
¼ cup slivered almonds
2 cups whipping cream
1 cup chicken broth
1 tablesoon dried sage
1 ½ teaspoon kosher salt
1 teaspoon ground black pepper

Preheat oven to 400 degrees. Sauté bacon in heavy medium skillet over medium-high heat until golden brown about 6 minutes. Drain bacon on paper towels and set aside in a 9x13 baking dish. Using some of the remaining bacon grease, saute the garlic until it is slightly brown and soft; set aside in a medium bowl. Using hands, toss the pasrnips, bacon and almonds together in the baking dish and spread out in an even layer. Combine cream, broth, cooked garlic, sage, salt, and pepper in medium bowl. Pour over parsnip mixture.
Bake gratin 30 minutes. Press down on parsnips with spatula to moisten evenly. Continue baking until parsnips are tender and liquid bubbles thickly, about 35 minutes longer. Let stand 10 minutes before serving.


Dessert is something that was untested. I thought of it while shopping for the parsnip gratin ingredients. Pumpkin Cheesecake. Luckily I have a new handy-dandy iPhone, so I was able to google a recipe right there in the store. How did I ever live without this brilliant piece of technology?!?! Ahem. So, the first result when I looked up "Pumpkin Cheesecake" was this recipe on Joy of Baking's website. A trusty source, no doubt, so that's what I went with. Besides, it had the ginger-snap crust I had been envisioning in my head when I first got the idea.

Of course I didn't read the recipe completely to see that the cooled cheesecake was supposed to chill for AT LEAST 8 hours before serving. And here it was coming out of the oven at noon on Thanksgiving day. I R SMRT. Oh well...it chilled for a few hours anyway, and was perfectly fine when we dug in. I guess if it were properly chilled, it would have been firmer, but it was silky and yummy just the same.


Pumpkin Cheesecake

Crust:
1 cup (100 grams) graham cracker crumbs
1/2 cups (50 grams) finely ground ginger cookies, homemade or store bought
1 tablespoon (15 grams) granulated white sugar
4 - 5 tablespoons (56 - 60 grams) unsalted butter, melted

Cheesecake:
2/3 cup (145 grams) light brown sugar
1/2 teaspoon ground cinnamon
1/4 teaspoon ground ginger
1/8 teaspoon ground cloves
1/8 teaspoon ground nutmeg
1/4 teaspoon salt
1 pound (454 grams) cream cheese, room temperature
3 large eggs
1 teaspoon pure vanilla extract
1 cup pure pumpkin puree (canned or homemade)

Topping:
1 cup sour cream
1 teaspoon pure vanilla extract
1/4 cup (50 grams) granulated white sugar

Preheat oven to 350 degrees F (177degrees C) and place the oven rack in the center of the oven.  Butter (or spray with a non stick spray) an 8 inch (20 cm) spring form pan. 
For Crust:  In a medium sized bowl combine the graham cracker crumbs, finely ground ginger snap cookies, sugar, and melted butter.  Press the mixture onto the bottom of the prepared spring form pan.  Cover and refrigerate while you make the cheesecake filling.

For Cheesecake:  In a separate bowl, stir to combine the sugar, cinnamon, ginger, cloves, nutmeg, and salt.
In the bowl of your electric mixer (or with a hand mixer), on low speed, beat the cream cheese until smooth (about 2 minutes).  Gradually add the sugar mixture and beat until creamy and smooth (1 to 2 minutes).  Add the eggs, one at a time, beating well (about 30 seconds) after each addition.  Scrape down the sides of the bowl and beat in the vanilla extract and pumpkin puree.
Pour the filling over the chilled ginger crust and place the spring form pan on a baking sheet to catch any drips.  Place a cake pan, filled halfway with hot water, on the bottom shelf of your oven to moisten the air.  Bake the cheesecake for 30 minutes and then reduce the oven temperature to 325 degrees C (165 degrees C) and continue to bake the cheesecake for another 10 - 20 minutes, or until the edges of the cheesecake are puffed but the center is still wet and jiggles when you gently shake the pan. 

Meanwhile whisk together the sour cream, vanilla extract and sugar.  Pour the sour cream mixture over the top of the baked cheesecake and rotate the pan slightly to evenly distribute the topping.  Return the cheesecake to the oven and bake about 8 minutes to set the topping.  Remove from oven and place on a wire rack to cool.  Loosen the cake from the pan by running a sharp knife around the inside edge (this will help prevent the cake from cracking).  Then place a piece of aluminum foil over the top of the pan so the cheesecake will cool slowly.  When completely cooled, cover and refrigerate at least eight hours, preferably overnight, before serving. 

Monday, December 01, 2008

Monday, November 24, 2008

fig crumble bars


I got a bit of a nesting bug this weekend, and felt I just HAD to bake something. So I flipped to the back page of all my Everyday Food magazines until I found something from their "Cookie Jar" that sounded just right. I landed on Fig Crumble Bars. They looked simple, but not so simple that I wouldn't curb my craving to bake. Plus, I just love fig.

The recipe is available on Martha's site. I did use apple sauce and some water instead of apple juice, because I forgot to buy the juice. It worked fine. These are sweet, buttery, a little earthy and have a nice brightness from the lemon zest. They would be great with some hot tea. I bet I'd enjoy them more if I didn't have a toothache :(

Tuesday, November 18, 2008

She's Back!


Yay! I finally got a chance to cook! Did you miss me?

I've had the Cooking Light Recipe Annual 2005 from the Library for more than a month (Don't worry, I renew). There are all sorts of little paper scraps sticking out of it marking recipes I want to try. Last night I picked "Roasted Butternut Squash and Bacon Pasta." I love Cooking Light as a source for healthy recipes...they realize that you can use real ingredients, not sweetners and subsitutes, to make a healthy meal. And this one has Bacon innit!

So I got to the store and they were out of Butternut squash. Dang! I decided to stick with the plan, though, using Acorn squash instead. I also adjusted the recipe to use a whole box of pasta rather than the 8 oz. they called for. If I just used half the box, I doubt I'd ever use the other half. I also incorporated garlic...as I do with most recipes, it seems. Gotta have it! The result was quite good...a great comfort food with yummy winter flavors.


Roasted Acorn Squash and Bacon Penne

3 medium acorn squash
dried rosemary
salt
pepper
ground nutmeg olive oil
6 cloves garlic

8 slices bacon
1 1/2 cups thinly sliced shallots
1 garlic clove, minced
16 oz. mini penne pasta
1/2 cup AP flour
3 1/2 cups 2% milk
1 cup sharp celtic lite cheddar cheese, shredded
1/3 cup fresh grated parmesan cheese
handful of pecans
salt and pepper

1. Roast Squash: preheat oven to 425. Cut Acorn squash in halves and remove the seeds with a spoon. Rub with olive oil, rosemary, nutmeg, salt and pepper. Put a garlic clove in each half and roast in casserole dish for about 40 minutes, until squash is softened but not too mushy. Let cool until you can handle them, then scoop the flesh out of the skin with a large spoon and chop up along with the garlic cloves. Set aside and turn oven temp up to 450.

2. Cook bacon until crisp. Crumble and set aside with Squash. reserve a bit of the bacon drippings and cook the shallots and minced garlic in the same pan until they are soft and brown. Combine shallots, bacon and squash and set aside.

3. Cook Pasta according directions and drain well.

4. Combine flour and some salt in a pan over medium-high heat. Gradually add in milk, whisking constantly. Bring to a boil and cook, stirring, until it thickens. Remove from heat and add cheddar cheese, stirring until the cheese is melted. Add the cooked pasta to the sauce and toss to coat well. Combine pasta with squash mixture, taste and adjust seasoning, and pour into a baking dish. Top with Parmesan cheese and pecans and bake at 450 for about 10 minutes until cheese melts and begins to brown.

Thursday, November 13, 2008

bill cosby as a jello pudding pop

still not able to do much cooking. so i present my hero of the day, found via the food tattoos flickr group. whoever would get this tattoo has got to be awesome.

Tuesday, November 04, 2008

funny filler

Life is kind of inside out and upside down right now, so there is not much cooking going on. Enjoy some Mitch Hedberg food comedy for the time being, and I will get back on track soon....


Sunday, October 26, 2008

taste & create; crockpot apple butter


For this month's taste & create event, I was paired up with HoneyB, keeper of the blog "The lives and loves of Grumpy's Honeybunch." Looking through her blog, I was pretty sure I would be making muffins, as that seems to be HoneyB's "thing." But then I saw it. Apple Butter. Growing up I loved apple butter something fierce, but as an adult I rarely think of looking for some, let alone making some. Nostalgia, the coolness of autumn and my love for anything crockpot told me I had to try this slow-cooker apple butter.

I am so happy I did. For one thing, this will make your house smell fantastic...that kind of fall, spicy, sweet warm smell that makes everything okay. Also, it tastes great. I, like HoneyB, love my sweets to have a kick, so I followed her advice and doubles the amount of spices. I changed the cooking times a bit...it cooked on high for about 3 hours, then I turned it to low and went to bed, so it cooked another 6 or 7 hours while I slept. In the morning, I let the cooked apples cool a bit, and put them in the fridge because I had to go to work. After work, I came home and used a hand blender to make the mixture into a smooth butter. Mine's a little thin. I think another hour or so without the lid on may have helped it thicken up. But I don't mind the thinner apple butter, and it tastes sooooo good. It tastes happy.

and yes, that is bacon on that toast with the apple butter in the first photo. so what? It's also quite amazing warmed up and poured over vanilla ice cream.


here is the recipe as I made it...

Crockpot Apple Butter

approx. 4 lbs. apples, peeled, cored and chopped
1 cup brown sugar
2 cups sugar
1/2 tsp. ground cloves
1/4 tsp. salt
2 tsp. cinnamon
1/4 tsp. fresh ground nutmeg

mix all the ingredients together and cook them in a crockpot on high for 3 hours. Turn the temp to low and continue cooking another 6-8 hours. Blend until smooth with a hand blender.


Go check out HoneyB's taste & create post, where she made my bacon-wrapped shrimp.

Friday, October 24, 2008

on top of spaghetti


The other night I came home from work. A work day that involved actual physical labor *gasp*. Normally I am parked at a desk, so days like that exhaust me. Yeah, I'm a baby. When I got home all I wanted was spaghetti and meatballs. I don't know why that was stuck in my head, as that is something we have never made. Perhaps because I had it a lot growing up? Comfort food. Anyway, I stared looking through the take-out menus, but Jack told me he would make me spaghetti and meatballs. Awww.

He claims this was his first time making meatballs, but it's hard to believe because the ones he made were phenomenal!! He says it's because of all the food shows he watches. I say he's a natural born baller. What made these meatballs so good? Well, they were well-browned and very flavorful, without being too herby or salty. They were moist and springy instead of being dry or spongy.


These were THE meatballs. Here is THE recipe:

Jack's Masterpiece Meatballs

1 pound ground beef (80-85% lean)
1 pound Italian sausage
4 oz white bread soaked in whole milk
1 egg, beaten
1/2 medium onion, finely diced
2 cloves garlic, minced
1/2 cup grated Parmesan or Romano cheese
1 tsp dried basil
1 tsp dried thyme
salt and pepper, to taste
all-purpose flour
olive oil

Sauté the onions in a couple teaspoons of olive oil with a pinch of salt until the onions have softened and become sweet. Add the garlic and herbs then continue to sauté for another minute. Allow to cool to room temperature.

In a large bowl, combine the beef, sausage, onion mixture, egg, the soaked bread (squeeze the bread gently to remove excess milk), and the cheese until all ingredients are incorporated evenly. If the mixture is too loose to handle, place in the refrigerator for an hour to give time for the mixture to firm up.

Using an ice cream scoop, measure out even amounts of the meat mixture and roll the mixture into approximate 2-inch balls and place on a plate or platter. Dredge each meatball lightly in flour, shaking off any excess and place on a baking sheet coated with olive oil.

Place the meatballs in a hot oven, preheated to 375 degrees and bake for 25-35 minutes, turning the meatballs 3-4 times during cooking. Increase the temperature to 450 and, using a spoon or turkey baster, baste each meatball with the oil/drippings that have collected in the bottom of the pan (or with fresh olive oil if there aren't enough drippings). Allow to cook an additional 8-10 minutes until the meatballs are browned thoroughly.


add these babies to your favorite marinara sauce and put 'em on some spaghetti, and you will soon be drunk with meatball happiness.

Wednesday, October 15, 2008

egg "noodles"


I saw this fabulous idea in a book I have from the library called The Ultimate Healthy Eating Cookbook by Anne Sheasby. Get this. Eggs as noodles! Not egg noodles, but actual eggs pretending to be noodles. Fun! I tried it out the other night.

It's pretty simple to do. Scramble up an egg (I added a dash of soy sauce for flavor and thinning power, but I don't think that's necessary). Heat up a non-stick skillet coated with cooking spray. Pour in your scrambled egg and coat the bottom of the pan with it. Keep rotating the pan so the egg is even and thin. Once it is no longer liquidy, put a lid on the pan briefly to make sure the top cooks. Once the egg pancake is firm and cooked through, roll it gently out onto a plate or cutting board. When it cools enough for you to handle it, cut the rolled up omelette into thin strips. Boom. Noodles.


I topped my "noodles" with a stir-fry. Basically I cooked some fresh grated garlic, ginger and some lemongrass from a tube in oil until it was fragrant and soft, but not brown. I added some sesame oil and soy sauce and cooked it a bit longer. I then removed most of everything from the pan, leaving a little bit for flavor, and sauteed some extra-firm tofu in it until it was slightly brown. I set the tofu aside and added back the garlic ginger mixture to the pan. I then added shredded cabbage, strips of red bell pepper, mushrooms, yellow onion and green onion and cooked this until everything was just soft, adding soy sauce, chili oil, and sesame oil as it cooked. Once the veggies were almost done, I added the tofu back in and a big handful of bean sprouts. Serve over the "noodles" with sriracha. I'm sorry this isn't much of a "recipe" but it's stir-fry. You can do whatever you want!


(P.S. can you tell I'm in love with my new stripey cutting board? 'cuz I am.)

Sunday, October 12, 2008

bruschetta x 3


Still on our bruschetta kick over here in Iron Stef kitchen stadium, we went a little crazy and made 3!! count 'em 3 different bruschettas for our dinner.


I made a normal 'ol tomato-based bruschetta.

For this I chopped up a carton of grape tomatoes and added 3 fresh garlic cloves, minced, a handful of fresh basil, julienned, a handful of capers, some salt, balsamic vinegar and olive oil. That's it. It was fresh tasting, but spicy from the raw garlic, and a little sweet from the balsamic. The capers added a certain salty depth to the sharp freshness of the basil, garlic and tomatoes.

Jack made the other two. First was a mushroom sage bruschetta topping.

He chopped up a small carton of regular button mushrooms, and sauteed them in about a tablespoon of butter and some olive oil, with a small handful of fresh sage leaves, chopped fine and some salt. This combination of flavors was fantastic. Earthy and rich.

For the next bruschetta topping, Jack veered away from veggies completely. It was a ricotta pine-nut spread.

To make this one, we toasted about a cup of pine nuts in a dry skillet until they were nicely brown. These got a few pulses in a small food processor until they were a coarse powder. Add the pine nuts to about 3/4 a container of ricotta cheese, and season with salt and white pepper. This, my friends, was unbelievable. So tasty. It will become a regular party spread, methinks. Jack said it might also make a wonderful sweet filling for canollis, if we added some nutmeg and sugar instead of salt and white pepper. I agree. Nutty, creamy...yes.

As you can see, we love topping bread with all manner of combos. I can't wait to try more. Any ideas?

Sunday, October 05, 2008

roasted veggie bruschetta


Around here, we've been attempting to eat more vegetables. One of our favorite things to do for dinner is bruschetta. Because there is crusty bread involved. And it goes well with wine ;)

Tonight I made some bruschetta using roasted veggies. I love roasting vegetables. It's one of my favorite things about cooler weather. The sweetness and depth that roasting imparts into food is so comforting, and takes very little effort.


To make this particular bruschetta, chop up half a red onion and 3 medium zucchinis into large bite-size pieces, add in a carton of cremini mushrooms (also called baby bellas...cut large ones in half), a carton of grape tomatoes, and about 8 or 9 garlic cloves, toss with olive oil, dried thyme, dried sweet basil, salt and pepper, and roast in a 375F oven for about 45 minutes...stirring a couple times throughout, and draining some of the liquid about halfway through. Once the veggies are nice and roasted...that is with plenty of caramelized edges...let them cool for about 20 minutes, then chop them up. Splash in some good sweet balsamic vinegar, taste and adjust seasoning. Toast some sliced bread in the oven. Once nicely browned, remove the toasts and rub one side with a clove of fresh garlic. Sprinkle with olive oil, top with the roasted veg topping, and give them a dusting of Pecorino Romano cheese. These go good with kalamata olives...So I bet you could even add some chopped kalamata to the topping.


That's it. Yes, I eat this for dinner, but it would make a good party appetizer as well. Although, be careful to serve them ASAP, because you don't want your toasts to get soggy.

Wednesday, October 01, 2008

potato chips in the microwave?!?!


A couple of my favorite blogs posted last week about making your own potato chips...in the microwave? Wha? Redonkulous! I had to see for myself. I've never seen anything crisp come out of a microwave. So I got some taters and broke out my thumb-eater mandoline and got to experimenting.


I did the first batch on paper towels, not overlapping. I nuked them for 3 minutes on full power then 3 minutes on 1/2 power, then 1 minute on 1/2 power a couple times until they looked nicely browned. And guess what? They were crisp! Amazing. They were also stuck to the paper towel. Here are a couple video demonstrating the chips' crunch and stuck-ness:


For the second batch I put the potato slices straight on a plate, and seasoned them with smoked salt. Same cooking method. This time, they stuck to the plate. Also, it seemed I had put too much salt on them. It didn't seem like alot when I put it on, but the flavors must have intensified a lot in the microwave.


For the third batch, I seasoned the taters with celery salt and garlic powder. This time I put the slices on parchment paper laid directly on the microwave's turning plate. The didn't stick this time! Well, they stuck together, because I overlapped them. I also over seasoned them again. :(


Then I thought I would go the next step and try making sweet potato chips.


I love me some sweet potato chips, but I rarely find them for sale. Plus I never like how they are seasoned. Using the parchment paper trick again, I nuked the sweet potato slices. They took longer than the russet potato, but eventually they crisped up. I just kept adding 1-minute until they were done. You have to watch carefully, I think...I could see these getting burnt pretty fast. The sweet potatoes also shrunk more than the russet, and they didn't stick together. They were not as pretty as I'd hoped, as they got a strange gray color to them...Still tasty and crisp, though!


In conclusion:

• Microwave potato chips are the real deal!! Crisp and potatoey.

• It's very easy to over-season/salt. Be very careful.

• Parchment paper is the best vehicle for these chips.

• Do not overlap the russet potato slices, as they will stick together.

• Sweet potatoes work well. I can't wait to make some chipotle flavored ones. And perhaps curry! Oh, and sweet ones with cinnamon and sugar!

• Ahem. The possibilities are endless...

Monday, September 22, 2008

fettuccine with preserved tuna, capers and olives


Another day, another library book to try out. This time a recipe from Simple Pleasures by Alfred Portale. It's a nice cookbook, to be sure...good photos, simple recipes using good but easy-to-find ingredients. The recipe I chose was fettuccine with preserved tuna, capers and olives. Preserved tuna? as in canned tuna? Heck yeah...cheap-ass dinners are always a plus. Hold up! He advises that we use high-quality tuna...like tuna we've preserved ourselves or the fancy imported from Italy stuff in olive oil. I had recently noticed some of this fancier, more expensive canned tuna at the grocery store. The recipe was the perfect opportunity to see why it cost more than double the good ol' chicken of the sea pantry classic (Is it chicken? Or is it fish?).

Okay, I'm a convert. The fancy-pants olive oil tuna was indeed a step above Charlie Tuna. Moist, good, mild flavor. It will probably be a new staple in the iron stef pantry. Alfred did not say whether or not to drain the olive oil before adding it to the pasta. So I drained some of the oil and left some in.


Though I was intrigued by this recipe and drawn to it, I was worried that all these strong flavors...tuna, anchovies, olives, capers...would be too much...too crazy...to strong.

In the end, the flavors all worked together. However, it was quite strong and rich. We could only eat a fraction of what we'd normally eat when we eat pasta. Which is not a bad thing...especially for my thighs. We also found, thanks to the abundant amount of leftovers, that this is much better eaten cold the next day, like a pasta salad, I suppose. That said, next time, I would use a pasta like penne or rigatoni, to make this more of a pasta salad. When it comes to pasta dishes, I like to either stab or twirl, not both. For long noodles that require twirling, I prefer a smooth sauce, no chunks. For chunky sauces, I like bite-sized pastas, so I can get everything in one fork jab.

Like I said, these flavors were strong, but they worked! Jack even combined the same ingredients a few nights later, sans pasta, to make a bruschetta topping. Yum! And now the recipe, slightly altered from the book's version...

fettuccine with preserved tuna, capers and olives

1 lb. dried fettuccine
¼ cup olive oil
3 cloves garlic, minced
6 anchovy fillets, rinsed, dried and minced
1 ½ cups canned tomato puree
2 Tablespoons capers
¼ cup kalamata olives, pitted and chopped
3 cans good quality tuna preserved in olive oil
Salt and pepper
Chopped flat-leaf parsley

Cook the pasta in salted boiling water until just al dente…about 7 minutes

Meanwhile, heat the oil in a wide, deep pan over medium. Add the garlic and cook until golden-brown, about 2 minutes. Add the anchovies and cook for 2 minutes more. Stir in the tomato puree and the capers.

Reserve ¼ cup of the pasta cooking water, then drain pasta. Stir the tuna and the olives into the sauce, then gradually stir in the pasta cooking water until the sauce attains a pleasing consistency. Add the hot pasta and toss. Season and toss again. Sprinkle with chopped parsley and serve.


Mmmm...notice the ceasar salad? Jack used the remainder of the anchovies and made the dressing from scratch! It's the only way to go!!

Tuesday, September 16, 2008

Italian-German Hybrid cupcakes


My friend at work, an awesome chick of Italian lineage, is marrying a fine fella of German descent. We held a surprise wedding shower for them last week, and I volunteered to make cupcakes. It's kind of become my "thing" at work...cupcakes for showers...though I can in no way compare my cupcake skillz to that of THE cupcake Stef...for one I spell my name with a "PH" rather than and "F" as my stage name implies. Second, my cupcakes usually involve a box mix. After all these years, baking still intimidates me. It's something I need to work on, but until then, my cupcakes seem to please.

Now, just because I am lame and my baking crutch is box mix, doesn't mean I can't inject a little bit of interestingness into my little cakeys. In this case, I wanted to pay homage to both of the heritages of the happy couple. Italian? Tiramasu! German? Well...German Chocolate Cake!! (Is German Chocolate Cake really German? Is there a lot of coconut trees in Germany?) The thought of how to combine the two into a harmonious cupcake plagued my mind for weeks. Then, the night before the shower, I just went for it. A hybrid of this Tiramisu cupcake recipe and this German chocolate frosting recipe. Ein klein wenig of this, un piccolo of that, and voila! (hey French, who invited you? Eh, whatever...like my online translation dictionary phrases are actually accurate anyway...) Italian-German cuppycake babies!!


Chocolate Tiramisu Cupcakes

1 package (18-1/4 ounces) chocolate cake mix
1-1/4 cups water
3 eggs
1/3 cup vegetable oil
3 tablespoons instant coffee crystals
2 tablespoons coffee-flavored liqueur
1 tablespoon unsweetened cocoa powder

Preheat oven to 350°F. Line 30 standard (2-1/2-inch) muffin pan cups with paper baking cups.

Combine all cupcake ingredients in large bowl; stir until well combined.

Spoon batter into prepared muffin cups, filling two-thirds full. Bake 20 to 22 minutes or until toothpick inserted into centers comes out clean. Cool completely.


German Chocolate Cake Frosting

1 cup evaporated milk
1 cup white sugar
3 egg yolk, beaten with 1 teaspoon water
1/2 cup butter
1 teaspoon vanilla extract
1 cup chopped pecans
1 cup flaked coconut

In a large saucepan combine evaporated milk, sugar, egg yolks, margarine and vanilla. Cook over low heat, stirring constantly, until thick. Meanwhile, toast about half of the coconut and the pecans in a 400 degree oven until they have browned slightly….about 8 minutes. Remove frosting from heat and stir in pecans and coconut. Let cool a bit before spreading onto cupcakes.


Tiramisu frosting

8 ounces cream cheese
1-1/2 to 1-3/4 cups powdered sugar
2 tablespoons coffee-flavored liqueur

combine cream cheese and 1-1/2 cups powdered sugar in large bowl; beat with electric mixer at medium speed until well blended. Add liqueur; beat until well blended. If frosting is too soft, beat in additional powdered sugar or chill until spreadable. Place into plastic bag and squeeze towards one corner of the bag. snip a tiny hole in that corner of the bag, then pipe the frosting onto the frosted cupcakes in desired designs.


So that was it. Espresso-flavored chocolate cupcakes (tiramisu!) with German chocolate cake frosting (seriously, make this. from scratch. it's amazing. you'll never buy the pre-made stuff in a tub again.) and decorated with "marscapone" (with so much going on already, why bother with the expensive marscapone...it would get lost... I used cream cheese). It's like this couple's future babies in cupcake form! ...Is that weird?

I wish I could have thought of a clever name for these. I am open to suggestions. I am also curious as to how you might have combined Italian and German into cupcake form...so speak up!!

Thursday, September 11, 2008

Grilled Fennel & Grilled Salmon...BFFs


Jack: “I feel like grilling…what would you like for dinner?”

Iron Stef: “Can you grill fennel?”

Jack: “We can try…”

So began a tale of two dinners. I wanted grilled fennel. Jack’s challenge was to a) figure out how to grill fennel and b) figure out what else to have with it. He came through with flying colors…

As for grilling the fennel, he simply cut the stems off and cut the bulb in half, trimming the root bottom off just enough so that the leaves all remained together in one unit.


For the main dish he chose salmon. He made a baste for the salmon by melting gobs of butter and adding minced garlic, salt, white pepper, lemon zest, and the chopped up fennel fronds. He also put some of the fennel stalks in to further flavor the butter. All this simmered for about 10 minutes then was taken off the heat to steep while the salmon and fennel bulbs were prepped.

He used the fennel butter to brush on both the fennel and the salmon as they were grilling. And that was about all there was to that dinner. It was lovely. Grilled fennel is amazing. And with grilled salmon? A great match.


Such a great match in fact, that the next night we grilled more fennel and more salmon! This time, however, we decided to make a salad out of them, to eat with crusty warm bread.


Grilled Salmon and Fennel salad

1 frozen pre-portioned skin on salmon half
2 medium bulbs fennel, with stalks and fronds
1 can cannellini beans
Salt
Garlic powder
Black pepper
Olive oil
2 lemons
Rice wine vinegar

1. Cut stalks off fennel, reserving the fronds. Cut the bulbs in half so you have 2 fairly flat halves that hold together at the bottom.

2. Coat the fennel with olive oil and season with salt, pepper and garlic powder. Do the same with the salmon. Squeeze the juice of half a lemon over the seasoned salmon.

3. Grill the fennel and the salmon on a pre heated grill, brushing occasionally with olive oil. After everything has been turned once or twice, squeeze the juice of one lemon over everything. Continue cooking until fennel is slightly soft and has dark grill marks, and salmon is cooked through.

4. Let everything cool a bit, before slicing fennel into pretty thin strips, and flaking the salmon off the skin (don’t you dare throw that skin out! Eat it! It’s delicious!!). Place into a bowl together. Add rinsed beans. Dress with olive oil, lemon juice and a bit of vinegar, and season with salt, pepper and white pepper. Toss gently and serve with crusty bread.


Yum yum. A perfect end-of-summer salad. And it made a lot, too! Which is great, because the salad is even better the next day, eaten cold. You may want to have a spare lemon around to freshen it up a little.